Wednesday, August 25, 2010

Thankful Favor

I just love sentiment stamps! I can't ever get enough of them because I always want something really special to put on my card or gift. Sweet N Sassy has some beautiful sentiments--beautiful messages and beautiful script. But hold your breath because you are just going to have to have the sentiments in the new clear stamp releases coming out September 1. Usually, I put the sentiment on the inside of the card and then never take a picture of that, but I created a special sneak peak of a new set called Blessings and Thanks with one of the sentiments from this set clearly visible.
Isn't that an awesome message? I told you you were going to have to have this set, but you have to wait a few more days to see the whole set. Take my word for it, they are all so special.
I think these little favor bags with this sentiment would be perfect for a Thanksgiving table setting, but also what a way to lift someone up. I wanted to create some texture so instead of using regular cardstock for the sentiment, I used some watercolor paper. This provided great texture with the added sponging around the edges. In weak imitation of the fabulous Darsie Bruno, queen of pearls, I added a few copic-colored pearls around the stamped sentiment. I colored some seam binding to create a custom-colored ribbon treatment and added the flower which my dear friend Jana gave me for my birthday. Inside I used some tulle to wrap up a few Hershey's nuggets.
Just a little FYI for all of you: Be sure to check out the blogs of the design team as well as the SNS blog to see more sneak peeks of the September SNS release. Also, there will be a big blog hop on August 31 and along the way you find some fun challenges which could lead to your winning one of the new clear stamp releases.  Don't ya just love the suspense!!!
Cheers!

Monday, August 23, 2010

Monday with Mom

This week's technique on Stamptv was to use water-based markers to add specific colors to a stamp. So, the copics got a rest this weekend. I used these butterflies from a Stampin Up set. After inking the stamp, I used a Stampin Write marker to add a little dash of color to the center of the butterflies. That's it! Super easy technique. I used the Stampin Up butterfly punch to punch them out and an EK Success punch for my leaf which I colored with a sponge and some inks. I used one of the new Sizzix Tim Holtz embossing folders on the background paper to get some distressing and added more distressing to the edges with my Distrezz-it-all.
Mom created this stunning card using the stamp and marker technique.
I love those brads added to the center of the flowers. What pretty colors and background papers, too. This is really a great technique for creating something special very quickly. It was kind of nice to let the copics sit on the shelf for the day. Though, I'm sure they'll be back in action before the week is over. Have a great day!
Cheers!

Thursday, August 19, 2010

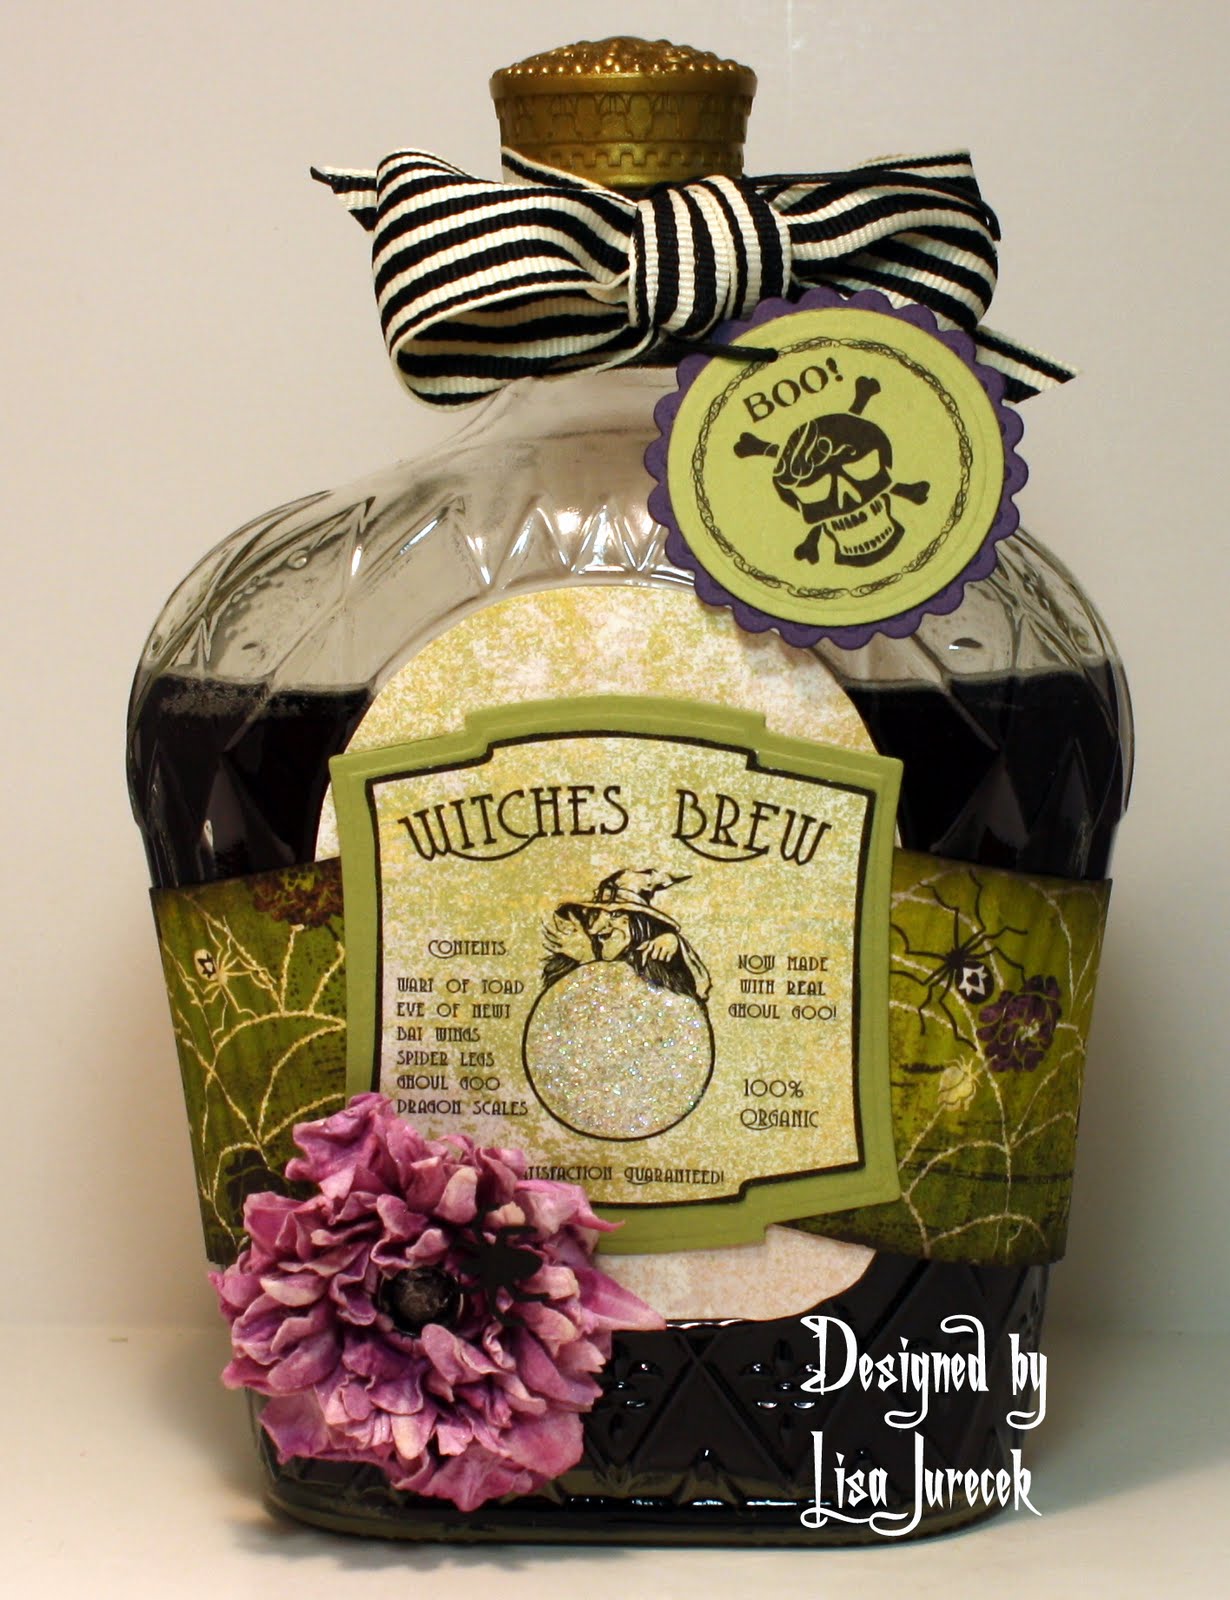
A Witchy Brew For You

Talk about a fast and super easy project, this one is all that and more! I recycled a pretty bottle and just poured in some grape soda. You could certainly add some other kind of beverage to this but the grape soda was fast and easy to acquire. I created a "label" for my witch's brew by tracing along the bottle's indentation and cutting out some Basic Grey Eerie paper. Then, using a scrap of the same paper, I printed out this label from the LSS Vintage Halloween set. This set is designed to match with your Spellbinders Labels Nestabilities. You don't have to use the Spellbinder's dies as it is very easy to cut out the label by hand. But I did create a mat for my label with one of the Labels Two  dies. The only thing I did to this image was add some stickles for a little shimmer.
More Basic Grey paper and a paper crimper created the band around the bottle. I added a flower that I custom-colored with my copics. I tied a bow around the top and added the circular label also printed from the LSS Vintage Halloween set and cut and matted using the Spellbinders Classic Circles Nestabilities dies. I really love this set, but I don't have all the Spellbinders Labels dies used and even though I don't "NEED" them for these images, this set sure makes me "WANT" them!
So, how's that for a fast, easy Halloween project. This set would make awesome labels for bottles of soda pop at a Halloween party! And, you are in luck because today only, there is a 40% off sale at LSS, so be sure to head over there and grab this set up! It is only $2.70, no tax and no shipping and you can have it instantly! Can't beat that with a stick (even a witch's broomstick!) Also, don't forget to check out the design team this week where I'm sure you'll find lots of inspiration and great ideas, and stop by Lindsay's blog for inspiration and a freebie!
Cheers!

Monday, August 16, 2010

Monday with Mom

Oh, my! Mom made the most adorable card using the Sweet N Sassy Woof You clear stamp set. I really love how she colored this little guy. On top of the great coloring, she used the tutorial over at Stamptv to create a flocked background on the card. It turned out just fabulous, but see for yourself.
The striped background paper was made using flock and score tape. I haven't tried this technique yet but Mom said it was really fun and I do need to use up some of my flock supply. This is a great little stamp set to work with. Hmmm! May need to get this one back from Mom.
Okay, I've really wanted to try the flocking technique but I've been trying to get some projects done and I didn't want to experiment just in case it turned into a disaster. So... let me show you what I did create. One of my coworkers had a birthday on Friday the 13th and I overlooked it (talk about bad luck). To make up for my oversight, I created a cake in a can for her complete with some icing in a baggie and a candle.
I've had few questions about how I create these and though I've shared this before on my blog, I thought it might be time to repeat it. First of all, I got my recipe for this from Jackie Gannaway. I discovered Jackie years ago at a Country Peddler show and have been a huge fan ever since. I still have the very first cookbook I ever bought from her, signed and everything. You can find Jackie's cookbooks and gift ideas here. This recipe is found in the Crafty Cans from the Kitchen book. Jackie doesn't actually cook up the cakes for the recipient. Her recipes call for creating and giving the mix in the decorated can. My way of thinking is that I don't want to cook up anything on my birthday, so I go ahead and bake the cake for the recipient in one can and while it's baking, I decorate a clean can. That way I can put the cooled cake in the decorated can with a little bit of glaze mix or icing in a zippered baggie.
Basically, you mix a small pudding mix with a store bought cake mix. You use 3/4 of a cup of the mixture per can. For each can, you'll add one egg, 1 T of water, and 1 T oil. Mix that together and pour into a buttered (not sprayed) can and bake at 350 degrees for about 30 minutes.  The cookbook will give you lots of ideas for different combinations for cakes, but there are other recipes in there including several bread recipes, too.
I just think this makes a nice, simple gift to give a coworker or neighbor without creating a whole cake.
Did you see those flowers on my can?
 I spent a large part of yesterday playing with flowers. I watched some videos and then got busy converting some primas and punching some patterned paper to create these gorgeous flowers. First, I stopped here and got the original inspiration. Then, went here to watch the video.
If you managed to get through this whole post, you've had quite a read. I'm not normally this chatty on a Monday morning, but I had lots of ground to cover today. Hope you found it enjoyable, helpful, or inspirational.
Cheers!

Sunday, August 15, 2010

Happy Birthday, Jana

Happy birthday to you! My dear friend Jana is having a birthday today and besides wishing her a very special day, I'd like to show you part of her birthday present that I made with my own two hands. The lovely thing about making this for Jana is that she's a papercrafter herself, so she really appreciates the time and effort that went into this!
First, I'll show you the envelope that holds the present. I created this with Lauren Meader's My Time Made Easy Simple Seedling cut file and my Cricut and Sure Cuts Alot software.
I created a band to go around the envelope and then used this great sentiment from the SNS Sew Happy Cocoa clear stamp set. You'll see why this is such an appropriate sentiment for this project in just a minute. I added a bow made from some custom-colored seam binding and some faux stitches. Now look what's inside!
The image and sentiment on the front is also from the Sew Happy Cocoa set! I colored Cocoa with my copics. I did some real stitching around the edges of this project. A few buttons and some more seam binding ribbon finish this off. Now, Jana has a little notebook to put all her crafty ideas in, notes, lists of books she wants to read (wink!), or anything she wants.
I hope she has a great day and I wish that for all of you! Get your craft on today!
Cheers!

Saturday, August 14, 2010

Fall Preview

I've got a little bit of a fall preview for today. Our weather is giving no inkling that fall is on the way, but in the craft room with the air conditioner at full blast, I can almost imagine a crisp, cool fall day!!! Anyway, here's some fall inspiration for you courtesy of Sweet N Sassy. Be sure to check out their line-up of new clear stamps and new digis. If you're ready for it, there's even some Christmas stamps.
Pumpkins are the perfect fall companion, and these make for an elegant look. This is the new Pumpkin Patch digi stamp from SNS, super easy to color. The sentiment is from the Autumn Lovin Cocoa clear stamp set, and here's another card using that set.
On both of these cards, I got happy with my cuttlebug and some embossing folders. The top one uses the Sizzix Tim Holtz Woodgrain embossing folder and this second one uses my favorite Provocraft Pumpkins embossing folder. I just love the fall colors and interesting textures on both of these, and the images are so much fun to work with.

Looking for a sale today without having to hit the stores? Lindsay's Stamp Stuff  and MyGrafico are having a back to school sale. Be sure and stop by to check out the great fall/holiday/back-to-school images there at a great price!

Thursday, August 12, 2010

Strawberry Jam

I made a peanut butter and jelly sandwich a couple of days ago and used up the last of my strawberry jelly. I started to toss the empty jar of Smuckers in the trash, but I got to thinking about my friends who make homemade jellies. Now, no! I didn't get inspired to whip up a batch of homemade preserves of any kind. I realized the only jam I know how to make is to "jam" a bunch of strawberry candies in a jar! That's about as homemade as it gets around here. And, yes, we're talking store-bought candies. So here's my version of strawberry jam!
Granted, you can't spread this stuff on a sandwich, but it's still looks pretty yummy. The beautiful strawberry image is from the LSS Strawberries and Watermelon Digital Stamp set. I had to use this set one more time to eke out the last juices of summer! I colored the image with my copics, and cut it out using my cuttlebug and Nestabilities Label 10 dies. The ribbon is from a gift set that I salvaged. That's a prima flower on top of the bow. The sentiment is from the PTI Tags for Spring set.
Go ahead...slap some jam on some bread and head on over to the LSS design team blogs to check out all the eye candy for this week...ya know you want to! Be sure to stop over and Lindsay's blog to see what pretties she has "cooked up" and check out her freebie for the week!
Cheers!