Monday, May 31, 2010

Monday with Mom 9

This week our Paper Dolls Group met and created File Folder Notebooks. The instructions for these are at SCS. We didn't really spend a lot of time embellishing them, so for our Monday with Mom installment this week, Mom and I decided we would embellish them and get them all ready for gift giving. For mine I used the new Sweet n Sassy Everyday Miracles Clear Stamp Set. Tomorrow is the B*I*G Clear stamp release at SNS where six clear stamp sets will be released. Be sure to check out the blog hop tomorrow!
I found the file folders at Walmart along with some coordinating paperclips which I included on the inside. The butterfly is colored, cut and layered on the oval nestabilities die cut. Thanks to my friend Cherie for the tutorial on creating the flower. I used my copic air kit to lightly color the pearls and the edge of the image. Now take a look at the goodies that go on the inside:
Again, I used images from the SNS Everyday Miracles set to decorate the inside. The 5X8 notepad has a decorative strip from some of the leftover file folder and a scrap of my decorative paper. I used the decorative paper to create the flowers on the paperclips.
Mom used a green file folder because she wanted to create a graduation gift for a graduate whose school colors are green and gold. She added a tassel! and some graduation sentiments to create a customized gift for the male graduate!
And now look how she fixed it up on the inside with a little cash to make sure we have a happy grad!
Love that little graduation cap with the tassel! These would also make great Teacher Appreciation gifts, too!
Project Recipe
Paper: WM File Folder, SU Basic Black CS and Raspberry Tart PP (retired)
Tools: Cuttlebug, Spellbinders Classic Ovals Nestabilities dies, Fiskars Apron Lace border punch, EK Success Flower punch, SU Scalloped Circle punch, copic markers, Spica Atyou markers
Embellishments: Paper Studio pearls, SU Pretty in Pink Corduroy Buttons, HL Decorative ribbon

Memorial Day Sale at MyGrafico


Sunday, May 30, 2010

Sweet Rose

I have never had much luck growing roses. I love them and love gardens that are full of them, but I have to stick with cactus and succulents because they require so little care. But determined to give it one more try and sucked in by spring plant selections at the nurseries, my husband I bought a rose to plant near our kitchen window. In a few weeks it will be no where near as beautiful as the one in this Sweet n Sassy June Rose Clear stamp collection, but at least we will have the memories!
Don't forget on June 1st, Sweet n Sassy will be bringing back clear stamps! We will be celebrating and showcasing these great stamp sets in a blog hop so be sure to stop back by and visit all the design team blogs! It's getting closer!
Project Recipe
Paper: PTI Aqua Mist and Ripe Avocado, DCWV Cafe Mediterranean PP
Stamps: Sweet n Sassy June Rose, SU Teeny Tiny Wishes (sentiment)
Tools: Cuttlebug, Spellbinders Long Rectangles Nestabilities dies, Martha Stewart Garden Trellis border punch, copic markers
Embellishments: Making Memories Wedding brads

Thursday, May 27, 2010

Rest and Relaxation by the Seashore

From the moment I saw the new LSS Seaside Sketches I knew I wanted to create a shadow box. I had to make a special trip to Hobby Lobby for some sand and small shells to make this happen.
The box was from a Christmas ornament, I think. One of those I just couldn't bring myself to throw away because you never know how useful it might be. Actually, this was perfect! It was deep with a clear lid that went all the way to the bottom of the box, so I didn't have to worry about escaping sand. The sides of the box were gold colored which actually also worked out perfectly with the sand. I added a blue mat around my image.
The image is colored with copics and as luck would have it (for once), I even had some Sand Ultra fine Flower Soft to create my beach. I love the peace and tranquility of the Seaside Sketches, but there's something missing...ME in a lounge chair sipping a margarita!!!! Only four more days of school left! Life is good! So grab some digis and your favorite coloring medium and RELAX!
Hey, be sure to head over to Lindsay's blog, the store and the whole design team before you pull out the blender and the sunscreen. Happy Crafting!
Lindsay Weirich (Owner & Stamp Designer)
Cheryl Gorka (DT Coordinator)
Cindi Hooks
Diane Bove
Jennifer Bliss
Karin Martin
Leanne Garner
Lisa Jurecek
Margie Visnick
Melissa Craig
Rebekah Doak
Rhonda Walker
Shannon Neparko
Tamara Bennett
Tracey Allen

Wednesday, May 26, 2010

Poppin Up Poppies

I wanted to create this shabby chic look with my new Sweet n Sassy Poppies and Greetings Clear Stamp Set. I looked all over my house for cardboard! Can you believe it? Any other day I would have had cardboard all over the house wondering how I was going to get rid of it all, but the one day I have an idea for using cardboard and I had to scrounge it out of my used book box. But I do love how this turned out!
I added a little gesso to the corner of my cardboard before layering other distressed papers on top. I inked the cardboard too with some Walnut distress ink. I stamped my poppies (aren't they gorgeous?) with Momento Tuxedo black ink so I could color them with my copics. Then, I added a little chalking around the image before cutting it out with my Spellbinders Nestabilities Label die. The crochet ribbon on the edge of a scrap of paper almost give the paper the look of fabric.
I see this as becoming the cover of a mini album. That's why I added the Thinking of You sentiment which is part of the Poppies and Greetings stamp set. To see more of this set, be sure to check out the SNS design team's creations throughout the week and then be sure to join us June 1st for a blog hop!
Project Recipe
Paper: cardboard, Prima Breathe and Sasha Paper Collection, Neenah Classic Solar Crest CS, SU Old Olive CS
Tools: Cuttlebug, Spellbinders Label 4 Nestabilities, copic markers, Heidi Swapp Distressing Tool
Embellishments: Offray Crochet Ribbon, Cream Tulle, Prima Calypso buttons, SU hardware

Tuesday, May 25, 2010

Cocoa's Coming to Clear Stamps

Look who is fixing to be a clear stamp! Cocoa! If you liked him in digis, you're going to LOVE him as a clear stamp set! Starting June 1st Cookies for Cocoa will be part of a clear stamp set that you can purchase at Sweet n Sassy. Also, to celebrate there will be a blog hop on June 1st to get things started.
There are six new sets being released this month in acrylic. Be sure to visit the store to see them all.

Monday, May 24, 2010

Monday with Mom 8

After a two-week break, Mom and I are back at it. This week's challenge from Stamptv was to create images beyond the border with nestabilites. The idea was to stamp an image and cut it out with Spellbinders nestabilities but to have part of the image outside of the border of the die.
I used one on the new clear stamp sets from Sweet n Sassy. If you haven't heard the news yet, Sweet n Sassy is adding clear stamps to the store. June 1st six new sets will be released! There will be a blog hop on that day and a release party. Don't miss all the fun!
I used the Everyday Miracles set to stamp my butterfly with Momento ink in Rich Cocoa and the sentiment in SU Taken with Teal. The paper is from the SU Sweet Pea DSP. I colored the butterfly with my copics and added stickles to part of the image.
I used the My Time Made Easy Trendy Tool Tote Template and my SCAL software and Cricut to create this gift holder. I've been making a lot of these lately and there are more to come. I'm trying to create gifts for some of the office personnel at our school before the school year ends.
Mom created a card for a friend of ours who recently lost her mother. She used the same technique with the nestabilities. Isn't her image gorgeous! I love how this turned out!
Be sure to come back throughout the week as I will continue to give you peeks of the new clear stamps from SNS! Happy Crafting!

Saturday, May 22, 2010

Gifts for All Occassions

All the buzz lately seems to be about gift giving. There are people getting gifts for teachers as the school year comes to an end. Others preparing grad gifts. And still others working on birthday, wedding, and baby gifts. I needed to pull together a retirement gift for our district librarian whom I will be replacing next school year. She's been so much help and encouragement to me this year. We are honoring her with a breakfast this morning and lots of gifts but one set of gifts are going in this little tote I made using the new Anemone Flower.

This will be filled with some special candies. I colored the anemone to match the napkins going on the table at her breakfast.
I created another little gift using the new Danny Dino image. I wanted something to give a little boy, so no bows or frillies. Just a couple of cute dinosaurs guarding a die cut box of dinosaur gummies.
These are identical images but I flipped one and then printed them both on some Basic Grey patterned paper. The little gummies don't show up very well in the window but the box is filled with more dinos!
I wish I could say my gift giving is done, but that is so not the case! But for all your gift giving needs, there are loads of images at Sweet N Sassy to make your gifts look just perfect!

Thursday, May 20, 2010

The Stars and Stripes

Do you detect a little bit of shabby chic in this card? I've become a little obsessed lately with distressing in it's many forms, so you can see the distressed edges, the inked edges, and some aging with my copic W00 and W1 markers. Hey, have you see Zutter's new little distressing tool? It's called the Distrezz-it (hope I spelled that right). It easily distresses any edges on cardstock and cardboard. I used a .99 distressing tool on my card and it worked just fine but I'm such a tool junkie, I will probably end up with the machine before it's all said and done! Then, watch out edges because nothing will be safe anymore!!!
The challenge this week at the Shabby Tea Room is to use red, white and blue. Easy enough with an image from the LSS Patriotic Collection digital stamp set.This set has loads of image perfect for projects for Fourth of July, Flag Day, Veteran's Day or any other event honoring our country and the men and women who have helped make it great!
Be sure to check out what the rest of the LSS Design team has prepared for your inspiration this week, and as always check out Lindsay's blog because she's sure to have a freebie that you won't want to miss! Happy Crafting!

Lindsay Weirich (Owner and Stamp Designer)

Cheryl Gorka (DT Coordinator)

Cassandra Cushman

Cindi Hooks

Jennifer Bliss

Karin Martin

Leanne Garner

Lisa Jurecek

Margie Visnick

Melissa Craig

Micki Harper

Rebekah Doak

Rhonda Walker

Shannon Neparko

Tamara Bennett

Tracey Allen

Project Recipe
Paper: SU Pacific Point CS, SU paper pad, Paper Studio Basics Collection PP, Neenah White Solar Crest CS
Stamps:LSS Patriotic Collection, Verve(sentiment)
Tools: Heidi Swapp distressing tool, copic markers, SU border punch
Embellishments: Paper Studio brads, PTI Pure Poppy Twill ribbon, button, twine

Monday, May 17, 2010

Deedee's Digis Blog Hop Winner

Thank you all so much for stopping by during the blog hop. I hope you had lots of fun, got some great ideas, and bought some cute digis. The winner of a digi of your choice at Deedee's Digis is Janette Fuller!
Janette Fuller said... Caity Caterpillar is so cute ~ The tote is a great idea!
Janette be sure to contact Deedee at amiste@sonic.net to let her know which digi you want!

Friday, May 14, 2010

Deedee's Digis Blog Hop

If you are looking for cute and super adorable in a digi stamp, look no further! Deedee's Digis are top-of-the-line CUTE! Hopefully, you have joined me from Leah's site and have already seen some great projects from this new digi stamp store. I've got another one that is just too cute to poot!
Using the Caity Caterpillar digital stamp set, I created a tool tote filled with some "little things" for our school secretary. I missed Secretary's Day because I was super busy with college work, but I wanted to get her something before the school year is out.
The sentiment "Enjoy the little things." is part of the whole set. There are four sentiments to go along with the image. Be sure to head to the store and check out the entire set. It's quite a steal for only $3.  I printed out Caity and colored her with my copic markers. Look at Caity close-up:
Love this little girl! Don't forget to leave a comment on my blog for a chance to win a digi of your choice. If this is your first stop, check out the links on the side bar and visit all the blogs on the hop for even more chances to win. Next head on over to Lorie's blog. Then, be sure you end up at the Crafting with Deedee's Digis blog for a freebie! Don't forget to check out the store to see ALL the amazing, inexpensive super cool digis!
Project Recipe
Paper: PTI White CS, SU Certainly Celery CS, The Paper Studio The Basics Paper Pack PP
Tools: Cricut, SCAL software, My Time Made Easy Tool Tote template, cuttlebug, Spellbinders Long Rectangles Nestabilities, copic markers, chalk, SU 1 3/8 circle punch, SU Scalloped Circle punch, EK Success 2" Scalloped Circle punch, Scor-Pal
Embellishments: Paper Studio rhinestone brads, silk flowers (Hobby Lobby)

Thursday, May 13, 2010

If You're Reading This--Thank a Teacher

It's that time of year again. School is fixing to be out and teachers are heading home for a much needed reprieve! Before they go, many of you like to show your appreciation for all their hard work getting your kiddos ready for the next level. With a couple of digis from Lindsay's Stamp Stuff, I was able to present the perfect teacher appreciation card.
The background paper is part of a digital stamp set called LSS School Papers. This one is printed onto PTI Vintage Cream cardstock with a little sponging distress around the edges. The central image is part of the LSS School Rules digital stamp set. I colored the image with my copics and then cut out most of it with my cuttlebug and nestabilities dies. I framed the image with black cardstock to create a chalkboard look. I used a scrap of SU Striped Grosgrain ribbon behind the image and a few SU Ruby Red ( a retiring color) brads. Then, I took a small binder clip and added the "thank you" sentiment to the top of the card.
Be sure to check out the LSS store and click on the Lindsay's Stamp Stuff blog roll to the right to see what all the other members of the design team have cooked up for this week! Have a zippy day!
Project Recipe
Paper: SU Ruby Red and Black CS, PTI Vintage Cream CS, Gina K White Pure Luxury CS
Stamps: LSS School Rules and School Papers, Verve (sentiment)
Tools: Cuttlebug, copic markers, Spellbinders Classic Rectangles Nestabilities, sponge, SU Tab punch
Embellishments: SU Ruby Red brads, binder clip (Walmart), SU Black Striped Grosgrain ribbon

Saturday, May 8, 2010

Book Buddies

If you missed the Sweet N Sassy SNR Digi Day 17 on Thursday, I was the hostess! The challenge is still up and if you participate before midnight Wednesday, you receive a 25% off coupon from Sweet N Sassy! The challenge is to use lace, anything that looks like lace.
I was inspired by the SNS digi stamp Lizzy Reading to Sassy. Since I am studying to be a librarian this image was just so appropriate for me, although I hope to be reading to kids not cats. I have a dear friend that is going through the whole MLS program with me and we have come running to each other regularly to whine, cry, and collaborate! But, this weekend marks the end of our semester, and I wanted to give her a little something to show her how much I appreciate her help, advise, and friendship. I found a paper mache' book at Hobby Lobby that I thought would make the perfect gift box. See what you think!

In case you can't see that it's book-shaped, look at it from this angle:
Okay, now take a look at the inside with a little gift card nesting inside. The sentiment on the inside cover is SNS True Friend.
Now that I'm a librarian, I may need to make some more of these to give as gifts! I just painted the book box with gold for the "pages" and black for the cover using acrylic paints. The paper for the book cover is Basic Grey Origins. On the inside, I printed the digi sentiment directly on the patterned paper. I colored Lizzy and Sassy with my copic markers and added some chalk around the image. The lace is from Walmart. It has holes for threading ribbon through it and I used PTI Lemon Tart Satin ribbon. I also used the PTI ribbon to create a book ribbon which I attached to the top of the "book". Then, I created some eyelet "lace" with my SU eyelet border punch. The bookplate hardware is also from SU, but I colored it with my copic airbrush system. The sentiment is SU Oval All.
I've still got to find the real goodies that I'm going to put inside, but I can't wait to give it to her!

Thursday, May 6, 2010

Knitty Gritty Cookie Box

Another one of my co-workers had a birthday this week, so I created one of these fry boxes or criss-cross boxes to hold a couple of cookies for her. She is a knitter and makes blankets to give to veterans! I can't knit or crochet anything, but I just had to run out and get some yarn to use on her box. I will probably end up giving her the leftover yarn, as well, since I won't really know what to do with it. I did like criss-crossing it across the box, though.
And, of course, I found just the perfect stamp to go on this box. I used the LSS stamp set All Around Phrases for the sentiment around the image. The image is from the totally awesome LSS Crafty Tools and Puns Digital Stamp Set that is chock full of goodies (sentiments and images) for all our crafting friends! You definitely need this one. Be sure to visit the LSS store at My Grafico. Lindsay is always releasing new digital treats and they are sure to please!
Also, be sure to check out what the whole LSS gang has been up to this week!
Lindsay Weirich (Owner & Stamp Designer)
Cheryl Gorka (DT Coordinator)
Cassandra Cushman
Cindi Hooks
Erin Bailey
Jennifer Bliss
Karin Martin
Leanne Garner
Margie Visnick
Melissa Craig
Micki Harper
Rebekah Doak
Rhonda Walker
Tamara Bennett
Tracey Allen

Now, I've got to get back to the last of my homework. Will this week never end! My craft room has been so neglected and I'm grouchy from withdrawal. Have a zippy weekend everyone!

Monday, May 3, 2010

Monday with Mom 7

I am still snowed under with school work, but it's my last week! I've got to keep this pretty brief so that I can head out to work and squeeze in some homework time, too. This week Mom and I tuned in to Stamptv for the tutorial on creating a drop shadow. Be sure to watch Gina's video on how to do this. It's quite simple.
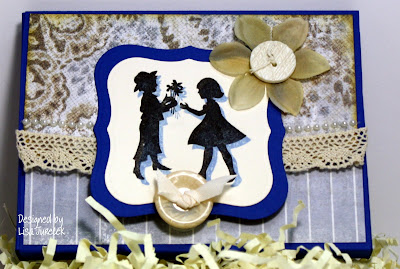
I grabbed a Close to My Heart silhouette set I had never before inked up. I'm pretty much a digi stamp girl these days, but it was kinda fun to ink up a stamp set for a change. This set is called Childhood Portrait. I don't think you can really tell in the picture, but this actually is not a card. It's a stationary box for holding cards, but since I have yet to make the cards that are supposed to go inside, I decided not to show it open.
There is velcro under the large bottom button so that this easily closes and reopens. I used some crocheted lace and added a silk flower that I got from Walmart or the dollar store, but I sprayed it with copics and my airbrush kit. The papers are from an old Wild Asparagus pack that I have had forever.
Mom also didn't create a card this week. She made a bookmark and created a beautiful drop shadow effect with a flower and some embossing.
It looks like the flower is sitting above the bookmark...so cool! The black and gold are an elegant combination. This is almost too pretty to leave hiding inside a book, but at least the recipient will have a treat every time she goes to read!
Thanks for joining us this week. Be sure to get your craft on and then come back next Monday to see what we have in store.